Thursday, November 29, 2018
Wednesday, May 16, 2018
Add animated headers to your Google Classroom and Forms!
By now you all know how to change the header image in your Google Classrooms and on Forms. You may not be aware, however, that you can add some pizzazz to these by uploading an animated image!
First, search for your image.
 For our example, we will perform a Google search for "space". Type this, or your own selection, in the Omnibox at the top of Chrome (Google calls the area where you type and find URLs the Omnibox). Next, select Images.
 Now select "Tools", then "Type", then "Animated".


First, search for your image.
For our example, we will perform a Google search for "space". Type this, or your own selection, in the Omnibox at the top of Chrome (Google calls the area where you type and find URLs the Omnibox). Next, select Images.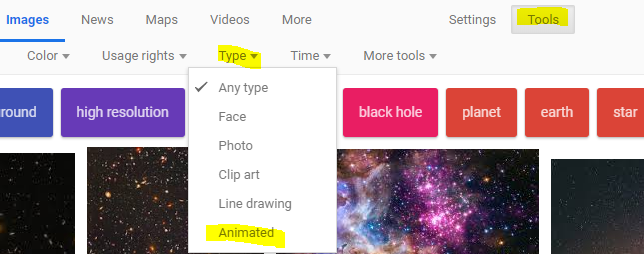 Now select "Tools", then "Type", then "Animated".
The size of headers in Classroom and Forms is 800x200 pixels. To ensure that we don't receive results that are too small, click on "Size", then "Larger than 800x600".


You may also want to consider filtering your images by usage rights, ensuring that you are not using someone else's property (their pictures) without their permission. Click "Usage rights", then choose one of the "Labeled for reuse..." options. Beware, though, that just because Google has labeled an image, does not necessarily mean that you actually have the rights to use the photo as Google says. For more info, check out "How not to use Google's new 'Image Rights' Filter", and "5 dangers of using Google Images without permission".
Once you find a picture that you would like to use, click on it to select, then right-click (2-finger tap or alt + click on a Chromebook), then select "Save image as". On a PC or Mac, choose where on your computer you want to save. On a Chromebook, this will automatically save in your Google Drive, if you are logged in.
To include your image in Forms, click on the color pallette in the upper right.
Then select the image icon, then upload from your computer.
In Classroom, select "Upload photo" in the upper right, then upload from your computer.
This video demonstrates the directions from this article.
Now go and wow your students and colleagues with your spiffed up Forms and Classroom!
Subscribe to:
Posts (Atom)